A 50×60 pre-engineered steel hangar with a bi-fold door, insulation, electrical, and a sealed concrete floor will run you somewhere between $120,000 and $270,000 in 2026. That is the real number. Not the “starting at” number that steel building companies put on their websites to get you to call, but the actual all-in cost when the concrete is poured, the door works, and you can park your airplane inside without sweating through your shirt in August.
I know that range is wide. Stick with me and I will break down exactly where the money goes, because there is a massive difference between a bare metal shell and a finished hangar you actually want to spend time in. According to multiple steel building suppliers including Titan Steel Structures and industry data from builders across Texas, the per-square-foot cost for hangar construction ranges from $25 at the absolute bare bones to $150 or more for a fully finished build with utilities and climate control.
Here is what I tell every pilot who buys an airpark lot. Build the hangar you will need in 10 years, not the one you need today. Every single pilot I know (myself included) has either upgraded airplanes or wished they had more shop space. Building too small is the number one mistake, and it is the one mistake you cannot fix without starting over.
So lets walk through the whole process, from sizing to doors to permits to the stuff nobody warns you about until its too late.
What a Hangar Actually Costs in 2026
Lets start with the numbers because thats what you came here for right.
Hangar construction costs break into four tiers, and the difference between tier one and tier four is not just money. Its the difference between a storage shed and a workspace you love.
Tier 1: The bare metal shell. Pre-engineered steel, no insulation, no finished floor, basic roll-up door. You are looking at $25 to $35 per square foot for the building kit itself. For a 50×60 (3,000 square foot) structure, thats roughly $75,000 to $105,000 for the shell. But that does not include the concrete slab, the hangar door, electrical, or site prep. This is the number steel companies advertise. Its not the number you will write checks for.
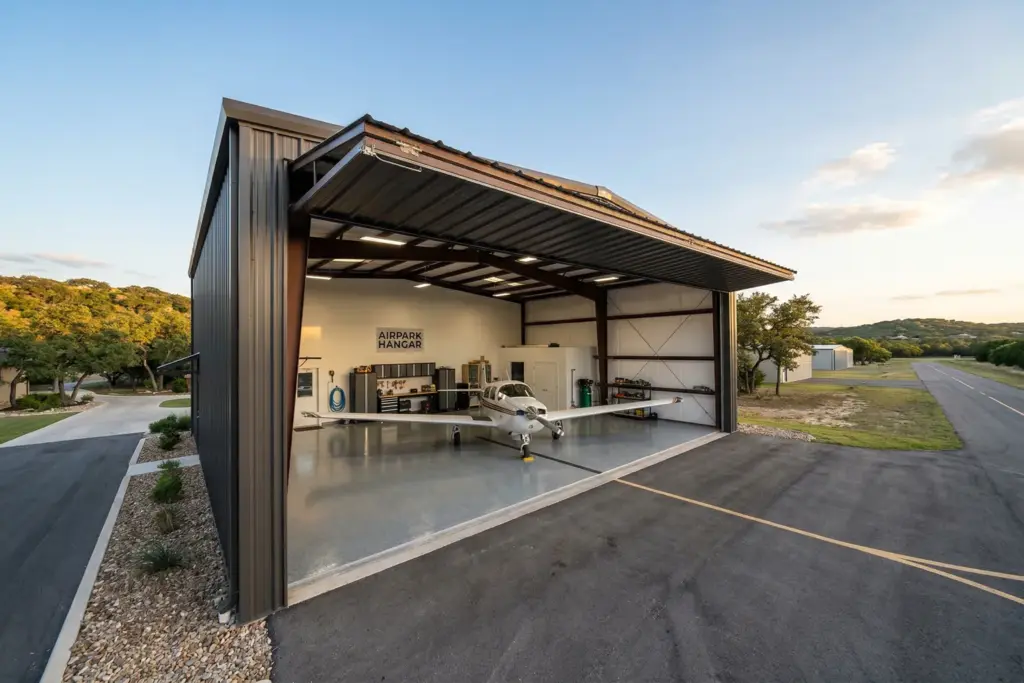
Tier 2: Functional hangar with a real door. Add insulation, a proper bi-fold or hydraulic hangar door, basic electrical, and a 6-inch reinforced concrete slab. Now you are at $40 to $90 per square foot all in. That same 50×60 is $120,000 to $270,000. Big range, I know. The door alone accounts for $15,000 to $50,000 of that spread depending on type and width.
Tier 3: The hangar you actually want. Add 220V electrical service (minimum for a compressor and real tools), LED lighting, water access, compressed air plumbing, epoxied floor, climate control, and internet. Now you are at $90 to $150 per square foot. For our 50×60 thats $270,000 to $450,000. Sounds like a lot right. But here is the thing, if you are going to spend time in this building (and you will), the comfort features pay for themselves in quality of life. Benjamin Graham’s whole concept of margin of safety applies here. Build with margin. You will never regret the extra circuits or the insulation.
Tier 4: The full custom build. Attached living quarters, office space, custom cabinetry, bathroom, kitchenette, loft, finished workshop area. These hangars start to blur the line between hangar and home. Budget $150 per square foot and up. I have seen airpark hangars in the Hill Country that are nicer than most people’s houses.
One thing that catches people off guard is the concrete slab. A standard 6-inch reinforced slab for a 3,000 square foot hangar runs $15 to $30 per square foot, which means $45,000 to $90,000 just for the floor. If you are parking anything heavier than a Bonanza, you may need thicker concrete or additional reinforcement. Do not skip the structural engineer on this one.
The Door Decision (This Is Where Pilots Lose Sleep)
Your hangar door is the single most expensive component after the building shell and slab. And it is the one you will interact with every single time you fly. Get this wrong and you will curse the decision for years.
Bi-fold doors are the most common choice for private hangars, and for good reason. Two panels hinged in the middle, lifted by an electric motor with cables or straps. They are reliable, proven, and every hangar door company in the country makes them. A 40-foot wide bi-fold runs $15,000 to $30,000. Go wider (50-60 feet) and you are looking at $30,000 to $50,000 or more. The downside is they need headroom above the door opening when raised, which means your building needs to be taller than you might think.
Hydraulic doors are the clean, sexy option. Single panel, hydraulic pistons on each side, lifts straight up like a drawbridge. Better seal than bi-fold (great for climate controlled hangars), less maintenance because pistons last longer than cables, and they look incredible. The catch is cost. You are paying a 30-50% premium over a comparable bi-fold. A 50-foot hydraulic door can easily hit $40,000 to $65,000. For the pilot who is building a show hangar or wants the best possible seal for avionics protection, hydraulic is worth the conversation.
Sliding doors are space-efficient and mechanically simple. They track along the outside of the building, which means zero headroom requirements. But they need clear wall space on one or both sides to slide open, which limits your exterior layout. Good option for irregular lots or hangars where vertical clearance is tight.
Stacking doors are essentially panels that fold together and stack to one side. Good for very wide openings where a single bi-fold would be impractical. Less common for private hangars but worth knowing about if you are building something large enough for a twin or a turboprop.
My honest advice? For most single-engine and light twin hangars in the 40-60 foot opening range, a bi-fold door from a reputable manufacturer gets the job done. Hydraulic if you are building a climate-controlled hangar and want the best seal. Do not overthink it. But do not go cheap either, because a hangar door that will not open on a perfect VFR morning is a special kind of frustrating.
Sizing: The 20% Rule
Measure your current aircraft with wings extended. Write down the wingspan and length. Now add 20% to both dimensions.
That is your minimum hangar footprint.
Why 20%? Because every pilot upgrades eventually. The Cessna 172 becomes a Bonanza. The Bonanza becomes a Cirrus. The Cirrus becomes a question you have to answer to your spouse (I have been there). If you build to exactly fit your current airplane, you are going to be shopping for a new hangar in five years. And hangars are a lot harder to trade in than airplanes.
Beyond the airplane itself, think about what else lives in this space. A workbench. Tool storage. Parts shelves. Maybe a tow bar and a golf cart for getting around the airpark. A small sitting area for the days you just want to hang out in the hangar and pretend to be productive (every pilot has these days, no judgement). Plan for at least 30% of the floor space to be non-aircraft. That sounds like a lot until you actually try to fit a workbench, a compressor, and three sets of wheel chocks into the leftover space around a Mooney.
For reference: a standard 50×60 (3,000 sq ft) hangar is the sweet spot for most single-engine pilots who want room to breathe. If you are flying a light twin or you know (be honest with yourself) that you will upgrade within a few years, go 60×80.
The Floor Matters More Than You Think
I can already hear someone saying “its just a floor” and I promise you it is not.
Standard for a hangar is a 6-inch reinforced concrete slab. That is fine for most general aviation aircraft. But if you are parking something heavy or if you are in an area with expansive clay soil (hello, Central Texas), you need to talk to a structural engineer about thickness, rebar spacing, and post-tension options. The slab is the one thing you absolutely cannot redo without tearing everything down, so get it right the first time.
Seal and epoxy the floor. This is the hill I will die on. An epoxied floor costs maybe $3 to $8 per square foot on top of the bare concrete, which is $9,000 to $24,000 for a 3,000 square foot slab. In return you get a surface that does not absorb oil, is easy to clean, resists staining, and makes the whole space look finished. You will be in this hangar for decades. Spend the money.
One more thing about the floor. Make sure the grade from your hangar to the community taxiway is correct. I have seen hangars where the taxiway transition was an afterthought, and pushing an airplane up even a slight grade on a hot day is miserable. The grading from your hangar floor to the taxiway should be engineered as part of the site plan, not figured out after the building is up. Your POA likely has specific requirements for this. Ask before you pour.
Insulation and Climate Control (Not Optional in Texas)
Ok I know this is the section where someone says “I will save $15,000 by skipping insulation and just deal with it.” Let me tell you what dealing with it looks like.
In July and August in Central Texas, an uninsulated metal hangar hits 140 degrees inside. Your avionics do not like that. Your paint does not like that. The rubber seals and hoses on your engine really do not like that. And you definitely do not like it when you are trying to do a preflight and you burn your hand on the cowling.
Beyond the heat, uninsulated hangars create condensation problems. Temperature swings between day and night cause moisture to form on metal surfaces, which means corrosion. On your building AND on your airplane. In the Hill Country where humidity can spike after rain, this is a real issue.
Insulation options range from basic fiberglass batts ($2-$4 per square foot installed) to spray foam ($4-$8 per square foot) to insulated metal panels which are built into the wall system. Spray foam is the gold standard for hangars because it doubles as a vapor barrier, but it costs more. Either way, the difference between an insulated and uninsulated hangar in Texas is the difference between a usable workspace and an expensive oven that happens to hold an airplane.
If you go climate-controlled (and in Texas you should at least have cooling for the summer), budget for a mini-split system. A 3,000 square foot hangar typically needs 2-3 units at $3,000 to $5,000 each installed. Your avionics will thank you. Your annual maintenance costs will be lower. And you will actually enjoy being in the hangar, which (lets be honest) is half the reason you bought an airpark lot in the first place.
Electrical, Plumbing, and the Stuff Nobody Talks About
Here is where I see the most regret. Pilots budget carefully for the building, the door, and the slab, and then treat utilities as an afterthought. Do not do this.
Electrical: At minimum you need 220V service. A decent air compressor needs it. A welder needs it. Good LED shop lighting needs a proper panel. My advice is to run more circuits than you think you need, because adding circuits after the walls are up is expensive and annoying. Plan for: overhead lighting, outlet circuits every 8 feet around the perimeter, at least two 220V outlets, exterior lighting, and a dedicated circuit for the hangar door motor. If you are doing climate control, the mini-splits need their own circuits too.
Water: A water supply line with a hose bib (or two) for aircraft wash-downs is borderline essential. Some pilots skip this and haul water in. Those pilots regret it immediately. If you can tie into the community water system, do it. If you need a well, factor that into the budget.
Compressed air: Run hard lines (copper or aluminum) with quick-disconnect drops at two or three locations in the hangar. This is a $1,000 to $2,000 add-on during construction but it transforms the workspace. Blowing out cowlings, inflating tires, running pneumatic tools. Once you have plumbed air, you will wonder how you ever functioned without it.
Internet and connectivity: Your airplane has avionics that need database updates. Your EFB needs WiFi. You probably want a security camera or two. Run ethernet during construction even if you plan to use WiFi, because WiFi in a metal building is terrible without proper access points. A hardwired access point mounted high in the hangar solves the problem permanently.
Ventilation: This one is easy to forget and important to get right. If you are doing any painting, using solvents, or running an engine inside (even briefly for maintenance), you need ventilation. At minimum, install exhaust fans rated for the cubic footage of your space. Some POAs require specific ventilation for fire code compliance. Check before you build.
The Permit Gauntlet
Building a hangar on an airpark lot involves more permits and approvals than a typical residential outbuilding, and the order matters.
Step 1: POA architectural review. This comes first. Before you talk to the county, before you hire a contractor, you need your Property Owners Association to approve the plans. Every airpark community has design standards covering building materials, colors, setbacks from the taxiway, maximum height, and sometimes even door style. At Lakeway Airpark, the standards are detailed. At newer communities like Georgetown Airpark, they may be more flexible. Either way, do not spend money on engineering drawings until you know what the POA will allow.
Step 2: County building permits. Most airpark lots in the Hill Country are in unincorporated county land, which means you are dealing with county permitting rather than city. In Travis County, permits are submitted through MyPermitNow and are valid for 180 days. Here is the big fight: classification. Counties sometimes want to classify hangars as commercial structures, which triggers commercial building codes, fire suppression requirements, and ADA compliance. If your hangar is part of a single-family residential property and is not being used for commercial aviation operations, push hard for residential classification. The code requirements (and costs) are dramatically different.
Step 3: Engineering and wind load. Texas has specific wind load requirements that vary by county. Your structural engineer needs to design for the local wind zone, and the building manufacturer should provide stamped engineering drawings that meet those requirements. In the Hill Country, expect wind load ratings of 90-110 mph minimum. This is not optional and it is not something to cut corners on. Pre-engineered steel buildings come with these calculations from the manufacturer, which is one of the reasons they are popular for hangars.
Step 4: Setbacks and runway considerations. Your hangar needs to meet setback requirements from property lines AND from the runway centerline and taxiway edges. These are not the same as standard residential setbacks. The POA and/or the airport authority will have specific dimensions. FAA Part 77 airspace requirements may also limit the height of your structure depending on proximity to the runway. Your architect or engineer should be familiar with these.
Step 5: Environmental. If you plan to store fuel (even a small amount for your tow vehicle), there are environmental regulations to comply with. Drainage from the hangar apron needs to be managed so that oil and fuel do not reach waterways. In areas near Lake Travis and the Hill Country aquifer system, this is taken seriously. Plan for it in the site design.
Fire suppression: Some POAs require fire suppression systems in hangars, others do not. Check both the POA rules AND the local fire marshal requirements. If required, a sprinkler system for a 3,000 square foot hangar adds $8,000 to $15,000 to the budget.
Timeline: Plan for 4-8 Months
Here is a realistic timeline from “I want to build a hangar” to parking your airplane inside.
Month 1-2: Design, POA review, and permitting. This is the slowest part. POA review alone can take 30-60 days depending on the community. Get your plans to them early and be responsive to feedback.
Month 2-3: Site preparation and foundation. Grading, forming, pouring the slab, and letting it cure. Weather matters here, especially in the spring when Central Texas rain can delay pours by weeks.
Month 3-5: Building erection. A pre-engineered steel building goes up fast once the slab is ready. The shell can be standing in 2-4 weeks. The door installation, electrical, plumbing, and interior finishing take another 4-8 weeks.
Month 5-6: Final inspections, punch list items, hangar door commissioning, and certificate of occupancy.
Pre-engineered steel buildings are faster than custom construction because the components are manufactured to spec before they arrive on site. If you go custom (wood frame, masonry, or architectural steel), add 2-4 months to the total timeline.
And budget a 20% time contingency for weather delays, permit holdups, and the general reality that construction never goes exactly as planned. I digress, but Nassim Taleb wrote a whole book about how we systematically underestimate how long things take. He called it the planning fallacy. I call it “every construction project I have ever been involved with.”
Common Mistakes (Learn From Other Pilots)
I have watched enough hangar builds at airparks in the Hill Country to know where people go wrong. Here are the hits.
Building too small. I already said this but it bears repeating. You WILL want more space. Period. The pilot who says “I just need room for the 172 and a workbench” is the same pilot who calls me three years later asking if there are any bigger lots available. Build for the airplane you will own in 10 years.
Ignoring ventilation. Paint, solvents, avgas fumes, exhaust. If you are doing any work in the hangar (and you will), you need airflow. Exhaust fans are cheap during construction and expensive to retrofit.
Skipping insulation to save money. I covered this already but I will say it again. In Texas, an uninsulated hangar is an oven from May through September. You will either retrofit insulation later (which costs more than doing it during construction) or you will avoid your hangar during the months when flying is best. Neither outcome is good.
Not planning electrical capacity. Add more circuits than you think you need. Then add two more. The cost difference during construction is minimal. The cost to add circuits after drywall or insulation is installed is not.
Forgetting the taxiway grade. The transition from your hangar floor to the community taxiway needs to be smooth and properly graded. A step, a lip, or even a slight uphill grade makes moving aircraft in and out a daily frustration. This should be in the site plan from day one.
Not reading the POA rules before designing. I have seen pilots hire an architect, draw up beautiful plans, and then find out the POA prohibits that door style or requires a different exterior material. Read the rules first. Design second.
Frequently Asked Questions
Lets Talk About Your Build
I am a pilot and a broker, which means I have spent time on both sides of this conversation. I have helped buyers find airpark lots in Lakeway, Spicewood, and Georgetown, and I have watched them go through the hangar build process from permits to parking their airplane inside.
If you are thinking about buying an airpark lot in the Hill Country (or you already own one and want to start planning your build), lets grab coffee and talk through it. I can walk you through what the POA requires, what the realistic budget looks like for your specific situation, and which builders have a track record on airpark projects in this area. And if you have not read it yet, my guide to fly-in communities in Central Texas covers which airparks exist and what makes each one different.
Be safe, be good, and be nice to people.


