 Ed
Ed 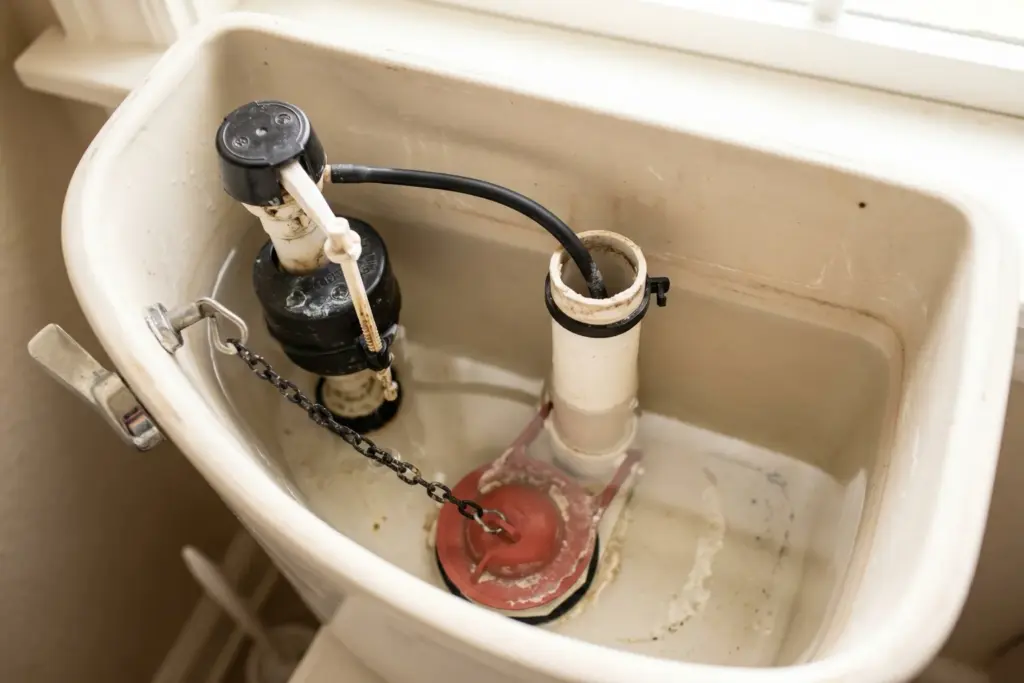
Some product links below are Amazon affiliate links. If you buy through them, Neuhaus Realty Group earns a small commission at no cost to you. We only recommend parts we’d actually use ourselves.
A running toilet wastes about 200 gallons of water a day, which on Austin Water’s tiered rate structure can add $50 to $100 to a single month’s bill (and yeah, that bill shows up looking like a clerical error). The good news is the fix is almost always a $25 combo kit (fill valve plus flapper, both in one box), takes about 20 minutes, and you do not need to call anyone.
So this is the first post in a new series we are doing on the blog. The idea is simple. I am a real estate broker, not a plumber. But I own a bunch of properties, I deal with maintenance issues constantly, and over 19 years I have ended up on a first-name basis with a lot of trades. So instead of writing a generic AI-slop “how to fix your toilet” post that someone who has never held a wrench wrote, I just asked my plumber. Then I asked him again. Then I made him stay until I understood it well enough to write it down. That is the series. Real answers from real trades, written up for homeowners who want to actually fix the thing instead of just reading around it.
Lets start with the most common call a residential plumber gets in Austin. The running toilet.
What’s actually happening when a toilet runs
Quick mechanics, because if you understand the system you can diagnose anything.
When you flush, three things happen in order. The flush lever lifts the flapper (the rubber seal at the bottom of the tank), which dumps the tank water into the bowl. As the tank empties, the float drops. When the float drops, the fill valve opens and starts refilling the tank. When the float rises back to the set level, the fill valve shuts off. The flapper falls back down and seals the tank. Done.
A toilet “runs” when one of those steps fails to complete. Either the flapper is not sealing (so water keeps leaking from the tank into the bowl, which keeps triggering the fill valve), the fill valve is not shutting off (so water keeps coming in and overflowing into the overflow tube), or the float is set wrong (so the fill valve never gets the signal to stop). That is the whole system. Three parts. One of them is the problem.
No big deal right.
The 4 likely culprits (in order of probability)
Here is the breakdown my plumber gave me when I asked what he actually sees on service calls in Austin. These percentages are his, based on a couple decades of residential calls in the area:
- Flapper failure, about 60% of running toilets. The rubber gets warped, mineral-coated, or just old. It does not seal.
- Fill valve failure, about 25%. The valve internals get gunked up with hard water deposits and either will not shut off or shut off too soon.
- Chain or float adjustment, about 10%. Chain too short or too long keeps the flapper from seating. Or the float is set too high and water keeps draining into the overflow tube.
- Tank-to-bowl gasket or flush valve seat, about 5%. The bigger rubber gasket between the tank and the bowl, or the plastic seat the flapper closes against. These are rarer and usually mean the toilet itself is old.
So 95% of the time it is one of the first three. All three of those you can fix yourself in under an hour for under $25 in parts, which is not that hard right. Lets diagnose.
The 5-minute diagnostic test
Before you buy anything, do this. It tells you exactly which fix you need.
Test 1: The food coloring test (identifies a leaking flapper). Take the lid off the tank. Drop 5 to 10 drops of food coloring into the tank water. Do not flush. Wait 15 minutes. If the bowl water turns colored without you flushing, your flapper is leaking. That is your fix. Most common result.
Test 2: The overflow tube check (identifies fill valve or float issue). Look at the white plastic tube sticking straight up in the middle of the tank. That is the overflow tube. If water is running into it, your fill valve is not shutting off or your float is set too high. Mark the water level on the tube with a pencil. Water should sit about an inch below the top of the tube. If it is at the top or going over, you have a fill valve or float problem.
Test 3: The chain check (identifies chain length). Look at the chain connecting the flush lever to the flapper. There should be a tiny bit of slack, maybe a quarter inch, when the flapper is closed. Too much slack and the flapper will not lift far enough. Too little and the flapper cannot fully seat. If the chain is taut or pooling at the bottom of the tank, that is your fix and it costs zero dollars.
Test 4: The listen test (identifies ghost flushing). If your toilet randomly cycles the fill valve every few minutes when nobody has flushed, you have a slow flapper leak. Same fix as Test 1.
Run all four tests in five minutes. Now you know exactly what to buy.
Which kit to buy
Two combo kits worth buying. Both include a fill valve and a flapper, both fit standard tanks, both come with the small bits you need to install. Buying a combo kit makes sense because the flapper and the fill valve are the top two failure modes (about 85% of running toilets combined), the parts wear on roughly the same schedule, and once you have the tank open you might as well replace both.
- The Fluidmaster 400AKRP10 fill valve and flapper kit is the classic pick at around $24. It is what most pros stock on the truck.
- The Korky 818MP QuietFILL Platinum fill valve and flapper kit costs a bit more but the fill cycle is noticeably quieter, which matters if your toilet shares a wall with a bedroom. The Korky internals also tend to handle Austin’s hard water a little better.
Either one fixes the running-toilet problem in about 30 minutes. Pick on price and noise preference. If you just want the cheapest thing that works, get the Fluidmaster. If your master bath toilet wakes your spouse up at 3am every time it refills, the Korky is worth the upgrade.
Fix 1: Replace the flapper (60% of cases)
What you need:
- A flapper. If you bought one of the combo kits above, use the flapper that came with it. If you only want to replace the flapper, a Korky 2″ Universal Flapper runs about $8 at Home Depot or Lowes. If your toilet has a 3″ flush valve (a few newer high-efficiency models), get the 3″ instead. Look at the size of the opening at the bottom of the tank. Most Austin homes have 2″.
- A sponge or old towel
- Maybe rubber gloves if you don’t love touching tank water (it is clean water by the way, fresh from the supply, but psychology is real)
Steps:
- Shut off the water at the supply valve. That is the little oval knob on the wall behind the toilet, usually on the lower left. Turn it clockwise until it stops. If it will not turn or feels frozen, see the “when to call” section below.
- Flush the toilet to empty the tank.
- Sponge out any remaining water at the bottom of the tank. You want it mostly dry so you can see what you are doing.
- Unhook the chain from the flush lever.
- Pull the old flapper off the two ears on the flush valve (or unhook it from a center post on newer models). It just slides or unsnaps. No tools.
- Snap the new flapper onto the same ears or center post. Make sure it sits flat against the flush valve seat.
- Hook the new chain to the flush lever. Adjust so there is about a quarter inch of slack when the flapper is closed. Most new flappers come with extra chain links so you can shorten as needed.
- Turn the supply valve back on. Let the tank fill. Test flush a couple times.
Time: 15 to 20 minutes the first time, 5 minutes once you have done it once.
Cost: $8 to $12 in parts.
Fix 2: Replace the fill valve (25% of cases)
If the food coloring test came back clean but water is running into the overflow tube, the fill valve is the problem. This is slightly more involved than the flapper but still very doable.
What you need:
- A fill valve. Either combo kit above (Fluidmaster 400AKRP10 or Korky 818MP) covers you. If you only want a fill valve and not the flapper, a standalone Fluidmaster 400A runs around $10 to $15. For Austin water I lean Korky for the hard-water reasons explained below. More on that in a minute.
- Adjustable wrench or channel-lock pliers
- Sponge and small bucket or bowl
- Old towel for the floor (some water will drip)
Steps:
- Shut off the supply valve. Flush. Sponge out the remaining water in the tank.
- Disconnect the supply line from the bottom of the tank. There is a plastic or metal nut under the tank where the supply hose meets the toilet. Unscrew counterclockwise. Have a bowl ready to catch a small amount of residual water.
- Loosen the lock nut on the bottom of the tank that holds the fill valve in place. Use the wrench. Counterclockwise.
- Lift the old fill valve straight up and out of the tank.
- Read the directions on the new fill valve. Every brand is a little different but the concept is the same. Adjust the height of the new valve to match your tank (most are telescoping or screw to height). The top of the valve should be about an inch above the overflow tube.
- Drop the new valve into the hole, screw down the lock nut from the outside (hand tight plus a quarter turn with the wrench, do not crank on it, you will crack the tank).
- Reconnect the supply line. Hand tight plus a small turn with the wrench. Again, do not over-torque.
- Attach the small refill tube from the new valve to the overflow tube. The valve comes with a clip. It points down into the overflow tube. This is what refills the bowl after a flush.
- Turn the supply valve on. Let it fill. Adjust the float on the new valve so the water level sits an inch below the top of the overflow tube. Most new valves have a screw or clip on the float that adjusts up or down.
- Test flush. Check for leaks at the lock nut and supply line connection.
Time: 30 to 45 minutes first time.
Cost: About $24 for the Fluidmaster combo kit, a bit more for the Korky QuietFILL Platinum kit. Standalone fill valve $10 to $15 if you skip the kit.
Fix 3: Adjust the chain or float (10% of cases)
This is the fix that costs nothing and takes 90 seconds. If you found the chain problem in the diagnostic, just shorten it. Most flush levers have multiple holes you can hook the chain into. Pick the one that leaves about a quarter inch of slack when the flapper is closed.
If the float is set wrong (water level too high so it is overflowing into the overflow tube, or too low so the flush is weak), adjust it. On older ballcock-style valves there is a metal arm with an adjustment screw at the top of the float. On newer Fluidmaster or Korky valves the float slides up and down the valve body with a clip or twist-collar. Lower the float to lower the water level. Aim for an inch below the top of the overflow tube.
Time: Under 5 minutes.
Cost: $0.
Why Austin water makes all of this worse
Here is the part the generic blogs leave out. Austin’s water is hard. Per Austin Water’s published quality reports, hardness runs around 180 to 220 parts per million, which is squarely in the “very hard” range on the EPA scale. That mineral content (mostly calcium and magnesium) does two things to your toilet:
It eats flappers. The minerals coat the rubber and make it stiff, which warps it over time and breaks the seal. Where a soft-water-area flapper might last 7 to 10 years, in Austin you should expect 3 to 5. If your flapper feels chalky or has white crust on it when you pull it out, that is calcium buildup.
It gunks up fill valves. Mineral deposits build up in the small ports inside the fill valve, which makes the valve close partially or stick open. This is the #1 reason Austin homeowners replace fill valves more often than their friends in, say, Seattle. The Korky QuietFill is slightly better at handling hard water than the Fluidmaster because of the way the internal seals are designed. Your mileage may vary, but my plumber’s preference is Korky for Austin.
One more Austin specific. If you live in a slab foundation home (which is most of central Texas), your supply line and shut-off valve are running through the slab. When you go to shut off the water for the repair, the shut-off valve itself may be old and stuck. Do not force it. If it will not turn with reasonable pressure, you have a different problem (more on that in a second).
The other thing hard water does is wear out water heaters faster, but that is a different post in this series. Coming soon.
When to stop and call a plumber
I do not believe in the “consult a professional” cop-out you see in most of these articles. The whole point of this post is that 95% of the time you can fix a running toilet yourself. But there is a 5% where you should stop, and an honest list looks like this:
- The supply valve is stuck or leaking when you try to shut it off. That is a $150 to $300 call to replace the angle stop. Worth it. A broken supply valve under water pressure can flood a room fast.
- You see a crack in the tank. Tanks crack. Usually slow leaks at first. You cannot patch a porcelain crack reliably. Replace the toilet, which runs $250 to $600 installed for a decent residential unit.
- Water is leaking between the tank and the bowl. That is the tank-to-bowl gasket, plus possibly the two bolts that hold the tank on. It is doable as a DIY but it requires lifting the tank off the bowl, which is heavy and awkward, and if you crack either piece you are buying a new toilet anyway. Plumber call is probably $200 to $400 and worth it for most people.
- Ghost flushing that will not stop after you have replaced both the flapper and the fill valve. Means the flush valve seat itself is pitted or warped. You can replace the seat (Fluidmaster makes a repair kit) but at that point most plumbers will recommend just replacing the toilet because the rest of the internals are aging too.
- Water under the toilet on the floor. That is the wax ring at the base, not a tank problem. Different repair entirely. Doable as DIY but messier and requires pulling the toilet off the floor. Plumber call $200 to $400.
- You have tried everything and it still runs. Sometimes the answer is just that the toilet is 25 years old and the whole thing is tired. There is no shame in replacing the unit.
For what it is worth, a straightforward “come fix my running toilet” call in Austin runs $150 to $250 most places, depending on whether they need to bring parts. Same-day plumbers downtown might be $200 to $350. Compare that to $12 in parts and a YouTube video and the math is pretty clear, but if any of the items above apply, just call.
A note on prevention
If you want to extend the life of every toilet in your house in Austin, do two things. First, when you replace the flapper or fill valve, set a calendar reminder for 4 years out to do it again. Do not wait for the toilet to fail. Hard water means these parts wear out on a schedule. Second, if you have a water softener already, your parts will last more like 7 to 10 years like the rest of the country. If you do not have a softener and you are tired of replacing parts, that is a conversation worth having. We covered the broader maintenance picture in our Complete Guide to Home Maintenance in Central Texas, including water heaters, AC, and the rest of the stuff Austin homes need that other markets do not.
Frequently Asked Questions
Coming next in the “I Asked My Plumber” series
This is post one. The next few in the queue are why your water heater dies faster in Austin (and what to do about it), how to actually diagnose a slow drain before you call a snake out, and the truth about garbage disposals. If there is a homeowner question you want my plumber to answer, send it in. The whole point of this series is to write the post the AI tools cannot, because they have never been in a tank in their life.
If you have a real estate question while you are at it, that one I can answer myself. Reach out anytime, no pressure.


